
AWS just announced the release of S3 Batch Operations. This is a hotly-anticpated release that was originally announced at re:Invent 2018. With S3 Batch, you can run tasks on existing S3 objects. This will make it much easier to run previously difficult tasks like retagging S3 objects, copying objects to another bucket, or processing large numbers of objects in bulk.
In this post, we'll do a deep dive into S3 Batch. You will learn when, why, and how to use S3 Batch. First, we'll do an overview of the key elements involved in an S3 Batch job. Then, we'll walkthrough an example by doing sentiment analysis on a group of existing objects with AWS Lambda and Amazon Comprehend.
For a detailed look at what we'll cover, here's a table of contents:
- Background: What is S3 Batch and why would I use it?
- Elements of an S3 Batch Operation
- Walkthrough: Running our first S3 Batch job
- Conclusion
Let's get started!
Background: What is S3 Batch and why would I use it?
Amazon S3 is an object storage service that powers a wide variety of use cases. You can use S3 to host a static web stite, store images (a la Instagram), save log files, keep backups, and many other tasks.
With S3's low price, flexibility, and scalability, you can easily find yourself with millions or billions of objects in S3. At some point down the line, you may have a need to modify a huge number of objects in your bucket. There are a number of reasons you might need to modify objects in bulk, such as:
Adding object tags to each object for lifecycle management or for managing access to your objects.
Copying objects to another bucket
Restoring objects from Amazon S3 Glacier
Indexing your objects in a database
This is where S3 Batch is helpful. You can specify a list of objects you want to modify and an operation to perform on those objects. AWS will manage the scheduling and management of your job.
Elements of an S3 Batch Job
Now that we know why we would use S3 Batch, let's understand the core elements of a Batch job.
There are four core elements to an S3 Batch Operation:
Manifest: A file indicating which objects should be processed in a Batch job
Operation: The task to be performed on each object in the job
Report: An output file that summarizes the results of your job
Role Arn: An IAM role assumed by the batch operation.
Let's dig into each of these more closely.
Manifest
When submitting an S3 Batch job, you must specify which objects are to be included in your job. This is done by way of a manifest.
A manifest is a CSV file where each row is an S3 object in the job. Your CSV manifest must contain fields for the object's bucket and key name.
For example, I could have a CSV with the following:
mybucket,myfirstobject
mybucket,mysecondobject
mybucket,mythirdobject
...
In the example above, the first value in each row is the bucket (mybucket) and the second value is the key to be processed.
You may optionally specify a version ID for each object. An S3 Batch job may take a long time to run. If you're using versioned buckets, it's possible that some of your objects will be written with a different version between the time you start the job and the time the object is processed.
If you wanted to use version IDs, your CSV could look as follows:
mybucket,myfirstobject,version234kjas
mybucket,mysecondobject,versionjlsflj214
mybucket,mythirdobject,versionliaosper01
...
In the example above, each line contains a version ID in addition to the bucket and key names.
In addition to a CSV manifest, you can also use an S3 Inventory report as a manifest. This will process all objects in your inventory report.
Your manifest file must be in an S3 bucket for S3 Batch to read. When specifying a manifest file, you must include an ETag of the file. An ETag is basically a hash of the contents of a file. S3 Batch makes you specify an ETag in order to know that you're using the correct version of a manifest.
Operation
Once you've identified which objects you want to process with the manifest, you need to specify what to do to those objects via the operation.
There are five different operations you can perform with S3 Batch:
- PUT copy object (for copying objects into a new bucket)
- PUT object tagging (for adding tags to an object)
- PUT object ACL (for changing the access control list permissions on an object)
- Initiate Glacier restore
- Invoke Lambda function
The first four operations are common operations that AWS manages for you. You simply provide a few configuration options and you're ready to go.
The last operation -- invoking a Lambda function -- gives you more flexibility. You can do anything you want -- perform sentiment analysis on your objects, index your objects in a database, delete your objects if they meet certain conditions -- but you'll need to write the logic yourself.
Let's look a little deeper at using a Lambda function in an S3 Batch job.
Using a Lambda function in S3 Batch
If you choose a Lambda function as your operation type, S3 Batch will invoke a Lambda function for each object in your manifest.
Your Lambda function should process the object and return a result indicating whether the job succeeded or failed.
Your Lambda function will be invoked with an event with the following shape:
{
  "invocationSchemaVersion": "1.0",
  "invocationId": "<longInvocationIdValue>",
  "job": {
    "id": "a2ba35a8-da5a-4a15-8c95-62d3ef611e78"
  },
  "tasks": [
    {
      "taskId": "<longTaskIdValue>",
      "s3BucketArn": "arn:aws:s3:::mybucket",
      "s3Key": "myfirstobject",
      "s3VersionId": null
    }
  ]
}
Information about the object to be processed is available in the tasks property. This is an array, but currently S3 Batch only passes in a single object per Lambda invocation. Hopefully they will allow batches of objects in a Lambda request in the future.
After performing the work to process the object in your Lambda function, you must return a specific response. The shape of the response should be as follows:
{
  "invocationSchemaVersion": "1.0",
  "treatMissingKeysAs": "PermanentFailure",
  "invocationId": "<longInvocationIdValue>",
  "results": [
    {
      "taskId": "<longTaskIdValue>",
      "resultCode": "Succeeded",
      "resultString": "Custom message here"
    }
  ]
}
Let's walk through this.
The invocationSchemaVersion is the same value as the invocationSchemaVersion on your incoming event. Similarly, the invocationId is the same as the invocationId on your event.
In the results object, you should have an entry for each element in your tasks array from the event object. Currently, there is only one object per invocation but this could change.
The object in your results array must include a taskId, which matches the taskId from the task. You must also provide a resultCode, indicating the result of your processing.
The valid values for resultCode are:
- Successful: The operation on this object succeeded.
- TemporaryFailure: The operation on this object failed but the failure was temporary. S3 Batch will retry this job a few times before ultimately failing.
- PermanentFailure: The operation on this object failed in a way that is unlikely to change. S3 Batch should not retry, and this object will be marked as failed.
You may also include a resultString property which will display a message in your report about the operation.
Finally, in the top-level object, there is a treatMissingKeysAs property that indicates the result code that should be assumed for keys that are not returned in the response. You may use any of the result codes mentioned above as the default value.
Report
S3 Batch allows you to specify a summary report for the end of your job. While the manifest and operation are required elements of an S3 Batch job, the report is optional.
Your S3 Batch report is a CSV file written to S3 with a summary of your job. You may choose to have a summary of all tasks written in the report or just the failed tasks.
I would strongly recommend using a report, at least for failed tasks. It is quite helpful for figuring out where your configuration or processing went wrong. If you are using a Lambda function operation, be sure to include a resultString message in each failed task to give yourself helpful guidance on how to resolve the issue.
Role ARN
The final part of an S3 Batch job is the IAM Role used for the operation. You will pass the ARN of an IAM role that will be assumed by S3 Batch to perform your job.
Configuring this IAM role can be tricky and can cause your job to fail in opaque ways. There are two key things you need to configure for your IAM Role ARN:
IAM permissions
Trust policy
Let's review each of these below.
IAM role permissions
The Batch job itself needs certain permissions to run the job. For example, we discussed the manifest file above that lists the objects to be processed. The manifest file is a file on S3, and the Batch job will need permissions to read that file and initialize the job.
Further, the Batch job will need permissions to perform the specified operation. If your operation is a Lambda function, it will need the lambda:InvokeFunction permission on the specified Lambda function.
If your operation is a PUT object tagging operation, it will need the s3:PutObjectTagging permission. Likewise with the PUT object ACL or other managed operations from S3.
Finally, if you have enabled a report for your Batch job, the report will be written to a specified location on S3. Your Batch job will need s3:PutObject permissions to write that file to S3.
Trust policy
When you have an AWS service assume an IAM role in your account, there needs to be a trust policy indicating that your IAM can be assumed by the specified service.
When creating your IAM role, add the following trust policy to your role so that it can be assumed by S3 Batch:
{
  "Version": "2012-10-17",
  "Statement": [
    {
      "Effect": "Allow",
      "Principal": {
        "Service": "batchoperations.s3.amazonaws.com"
      },
      "Action": "sts:AssumeRole"
    }
  ]
}
If you're using CloudFormation to create your IAM role, the trust policy will go in the AssumeRolePolicyDocument property.
Additional configuration options
The four elements noted above are the key parts of an S3 Batch job. However, there are a few additional configuration options worth mentioning briefly.
A Batch job must have a Priority associated with it. This can be used to indicate relative priority of jobs within your account. S3 Batch will only run so many operations across your account at a time. You can expedite a new job without cancelling a long-running existing job by indicating a higher priority for the new job.
You may submit a ClientRequestToken to make sure you don't run the same job twice. If two jobs are submitted with the same ClientRequestToken, S3 Batch won't kick off a second job. This can save you from a costly accident if you're running a large job.
Finally, you may indicate that a job must be confirmed before running by setting ConfirmationRequired to "True". With this option, you can configure a job and ensure it looks correct while still requiring additional approval before starting the job.
Now that we know the basics about S3 Batch, let's make it real by running a job.
Walkthrough: Running our first S3 Batch job
Alright, we've done a lot of background talk. It's time to put it into action. In this section, you will run your first S3 Batch job. We'll use the Lambda invocation operation.
Imagine that you have a bunch of text files in S3. One day, your boss asks you to detect and record the sentiment of these text files -- is the context positive, negative, or neutral?
You can use Amazon Comprehend in your Lambda function in an S3 Batch to handle this operation. Follow the steps below to see how.
Why use the Serverless Framework?
In this walkthrough, we'll use the Serverless Framework to deploy our Lambda functions and kick off an S3 Batch job. Before we do that, let's see why we'll use the Serverless Framework.
The Serverless Framework is a tool for developing and deploying AWS Lambda functions as part of larger serverless applications. Packaging and deploying your Lambda functions can require a lot of scripting and configuration. The Serverless Framework offloads a lot of that boilerplate and makes it easy to focus on the important work.
If you want to know more about the Serverless Framework, check out my previous post on getting started with Serverless in 2019.
In addition to assisting with AWS Lambda development, the Serverless Framework has a nice plugin architecture that allows you to extend its functionality.
I've created the serverless-s3-batch plugin to show you how this works. This plugin helps with a few things:
Provisioning your IAM role for an S3 Batch job
Reducing the boilerplate configuration around starting a job.
We'll use the plugin in the steps below.
Setting up
Note: I'm assuming your environment is configured with AWS credentials. If you need help with this, read this guide or sign up for my serverless email course above.
Let's get set up with the Serverless Framework and our sample project.
Install the Serverless Framework
If you haven't used Serverless before, install it using NPM:
$ npm install -g serverlessCreate a Serverless service from the example project
Run the following command to bring the example service onto your local machine:
$ sls create --template-url https://github.com/alexdebrie/serverless-s3-batch/tree/master/examples/lambda-comprehendInstall service dependencies
Change into the service directory and install the dependencies:
$ cd lambda-comprehend
$ npm i
Create your S3 bucket
We'll need an S3 bucket for this exercise. If you don't have one, you can create one using the AWS CLI:
$ aws s3 mb s3://<bucket-name>Be sure to provide your own value for
<bucket-name>.Once you've created your bucket, export it as an environment variable:
$ export S3_BATCH_BUCKET=<your-bucket-name>
Deploying our function and role
Now that we've done some basic set up, let's deploy our Lambda function.
The core file in a Serverless Framework project is the serverless.yml file. This is a configuration file that describes the infrastructure you want to create, from AWS Lambda functions, to API Gateway endpoints, to DynamoDB tables.
Our serverless.yml file looks as follows:
service: lambda-comprehend

plugins:
  - serverless-s3-batch

custom:
  s3batch:
    manifest: s3://${env:S3_BATCH_BUCKET}/manifest.txt
    report: s3://${env:S3_BATCH_BUCKET}/reports
    operation: detectSentiment

provider:
  name: aws
  runtime: python3.7
  stage: dev
  region: us-east-1
  iamRoleStatements:
    - Effect: Allow
      Action: "s3:GetObject"
      Resource: "arn:aws:s3:::${env:S3_BATCH_BUCKET}/*"
    - Effect: Allow
      Action: "comprehend:DetectSentiment"
      Resource: "*"

functions:
  detectSentiment:
    handler: handler.detect_sentiment
The key parts for us to note right now are:
The
pluginsblock. This is where we register theserverless-s3-batchplugin that will extend the functionality of the Framework.The
functionsblock. This is where we configure our AWS Lambda function that will call Amazon Comprehend with each object in our Batch job manifest.The
providerblock. This is where we describe additional information about our function, such as the AWS region to deploy to and some IAM policy statements to add to our Lambda function. In our service, we've given the ability to read objects in our S3 bucket and to callDetectSentimentin Comprehend.
If you want to see our function logic, you can look at the code in the handler.py file.
To deploy this service, run the following command:
$ sls deploy
This is doing two main things. First, it's deploying and configuring the AWS Lambda function that you've declared in the functions block. Second, the serverless-s3-batch plugin is creating an IAM role that can be used for your S3 Batch job.
After a few minutes, your deploy should be complete and you'll see output like the following:
Serverless: Stack update finished...
Service Information
service: lambda-comprehend
stage: dev
region: us-east-1
stack: lambda-comprehend-dev
resources: 6
api keys:
  None
endpoints:
  None
functions:
  detectSentiment: lambda-comprehend-dev-detectSentiment
layers:
  None
Creating an S3 Batch job
Now that our function is deployed and our IAM statement is ready, let's create our job.
As mentioned in the overview section above, each S3 Batch job needs a manifest file that specifies the S3 objects that are to be included in the job.
In this example, there are some example files in the files/ directory. Since we're doing sentiment analysis, we've got a few different types of files.
The first, think-of-love.txt, is a famous Shakespeare piece on love:
If I should think of love
I'd think of you, your arms uplifted,
...
On the other end of the spectrum, we have the text of Alfalfa's love letter to Darla, as dictacted by Buckwheat, in the 1990s movie Little Rascal's. Its contents are a little less uplifting:
Dear Darla, I hate your stinking guts. You make me vomit. You're scum between my toes! Love, Alfalfa.
Finally, we have Marc Antony's speech in Julius Caesar:
Friends, Romans, countrymen, lend me your ears;
I come to bury Caesar, not to praise him.
...
Let's create a manifest and upload both the manifest and these files to our S3 bucket. You can do so by running:
make upload
If you set your S3_BATCH_BUCKET environment variable, it should upload the files.
Let's take one look at our serverless.yml file again. In the custom block, we've got a configuration section for the S3 batch plugin. Its contents are:
# serverless.yml
custom:
  s3batch:
    manifest: s3://${env:S3_BATCH_BUCKET}/manifest.txt
    report: s3://${env:S3_BATCH_BUCKET}/reports
    operation: detectSentiment
It's specifying the location of the manifest, where we want the report to be saved, and the Lambda function to use in our operation.
We can start our job with the following command:
npx sls s3batch create
You should see output that your job was created as well as a link to view your job in the AWS console.
Serverless: S3 Batch Job created. Job Id: 8179eff2-5b4d-4be9-9238-4eaa86711b9c
Serverless:
Serverless: View in browser: https://console.aws.amazon.com/s3/jobs/8179eff2-5b4d-4be9-9238-4eaa86711b9c
Open the link in your browser to check on your job.
Viewing the report
When you view the job in your browser, you should see a screen like this:
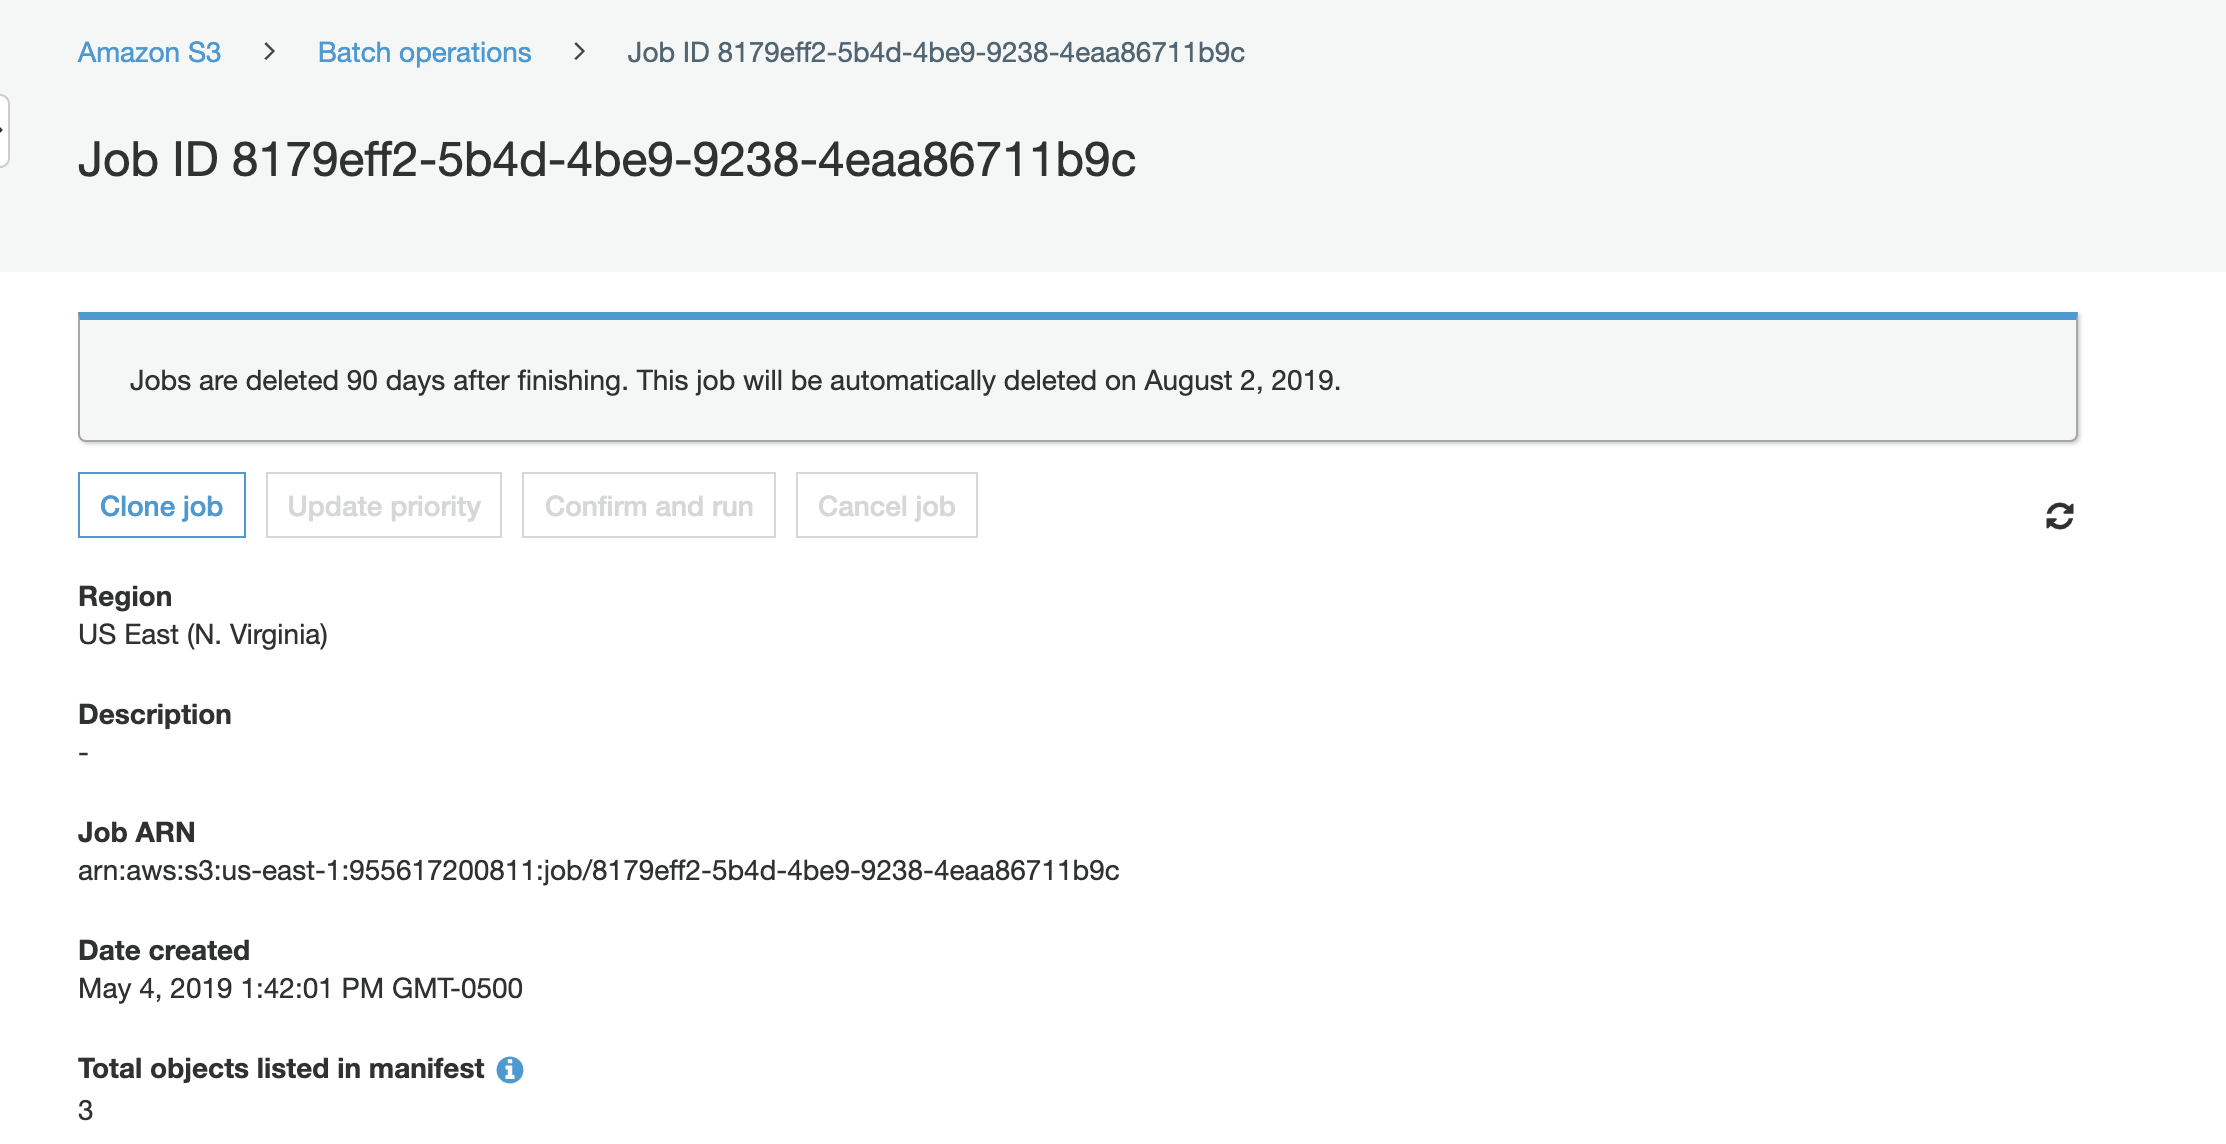
It includes helpful information like the time it was created and the number of objects in your manifest.
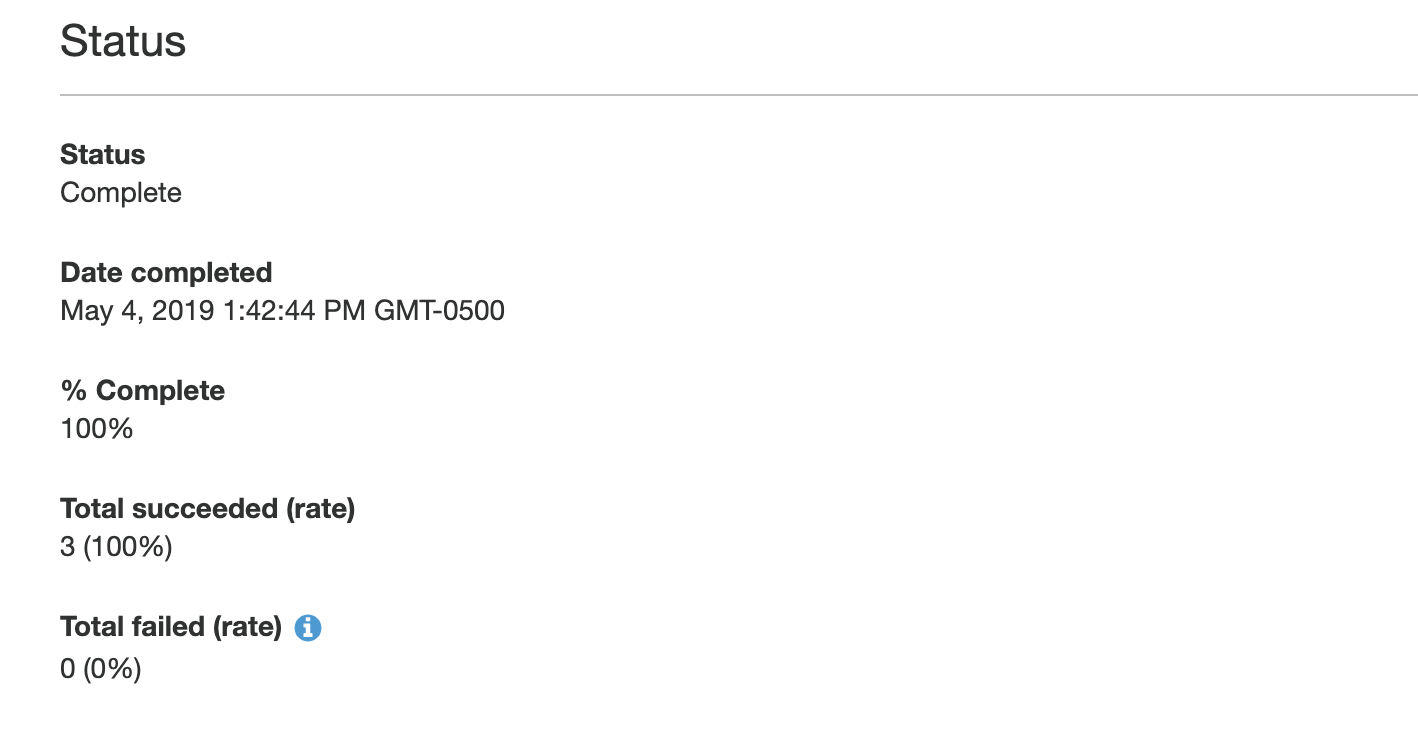
If you want a minute, you can check the details of your job in the Status section. It lets you know how much of your job is complete and how many tasks succeeded and failed.
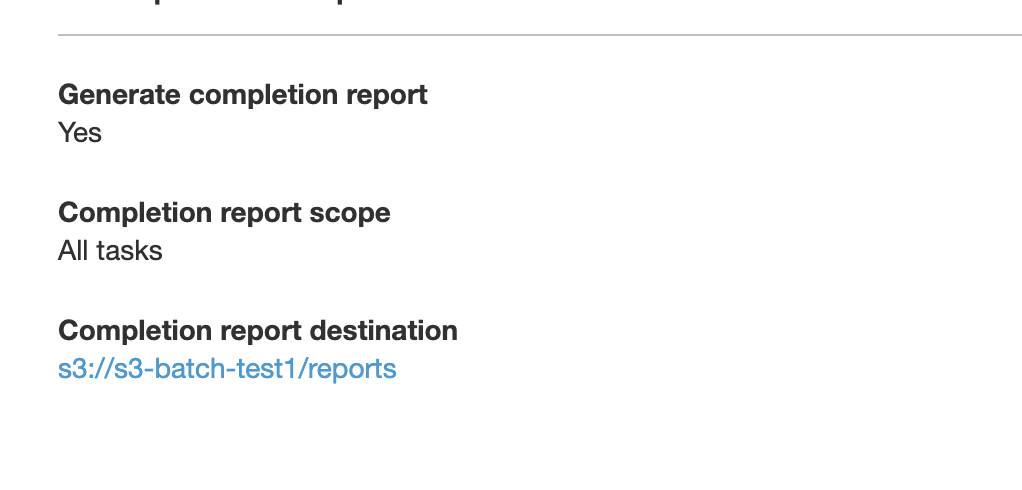
Finally, the report section at the bottom includes a link to your report:
Your report will be located at <your-bucket>/<your-prefix>/job-<job-id>/results/<file>.csv. The results will be in CSV format, as shown below:
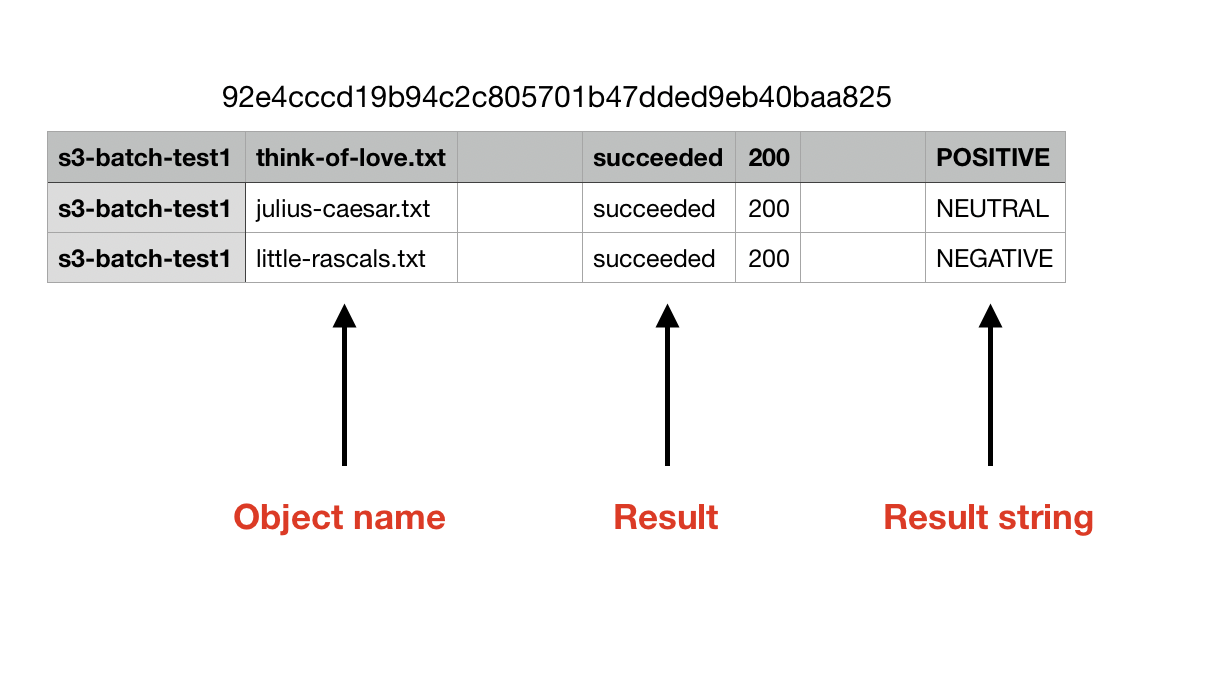
In your CSV file, it will include the name of the object for each object in your manifest. It will also show the result for each object -- whether the task succeeded or failed.
Finally, it will include a result string, if provided in the Lambda function. In our Lambda function, we returned the sentiment analysis result from Amazon Comprehend. You can see that the love poem was rated POSITIVE, the Little Rascal's piece was rated NEGATIVE, and Marc Antony's speech was rated NEUTRAL.
That's it! You ran your first S3 Batch job. Feel free to tweak the parameters or to experiment on some of your own files.
Conclusion
In this post, we learned about S3 Batch. These are a powerful new feature from AWS, and they allow for some interesting use cases on your existing S3 objects.
First, we covered the key elements of S3 Batch, including the manifest, the operation, the report, and the role ARN. Then, we walked through a real example using the Serverless Framework and Amazon Comprehend.
If you have questions or comments on this piece, feel free to leave a note below or email me directly.